1. Introduction
Compression moulds are widely used in manufacturing products made from thermosetting plastics, rubber, silicone compounds, composite materials, and other mouldable materials. These moulds operate under heat and pressure to shape raw materials into finished products.
During production, compression moulds are exposed to repeated heating and cooling, mechanical pressure, friction, chemical residues, and material buildup. Over time, these conditions can cause wear, corrosion, surface damage, dimensional changes, and reduced product quality.
Extending compression mould life requires proper operation, regular cleaning, preventive maintenance, correct temperature and pressure settings, and appropriate storage.
With a well-planned maintenance programme, manufacturers can reduce mould damage, minimise production downtime, improve product consistency, and lower overall manufacturing costs.
This guide explains the major causes of compression mould wear and provides practical methods for extending mould service life.
2. What Is a Compression Mould?
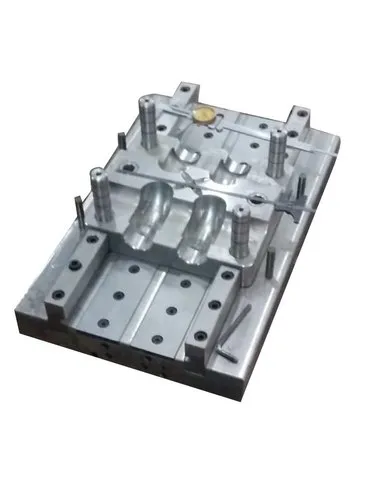
A compression mould is a manufacturing tool used to shape material by applying heat and pressure inside a mould cavity.
The material is placed into an open heated mould. The mould then closes, and pressure forces the material to flow into the cavity. Depending on the material, the product is subsequently cured, solidified, or otherwise conditioned before being removed.
Compression moulds may contain several components:
- Upper mould half.
- Lower mould half.
- Mould cavity.
- Core or cavity inserts.
- Guide pins and guide bushes.
- Heating elements or heating channels.
- Ejector components, where applicable.
- Venting grooves or passages.
- Alignment and clamping features.
Each component must function correctly to maintain product quality and protect the mould from premature damage.
Why Mould Life Matters
A compression mould represents a significant investment. Premature wear can lead to expensive repairs, production interruptions, and replacement costs.
Extending mould life helps manufacturers achieve:
- Lower maintenance and replacement expenses.
- Reduced production downtime.
- Consistent product dimensions.
- Better surface finish.
- Lower rejection rates.
- Improved manufacturing efficiency.
- More predictable production planning.
3. Common Causes of Compression Mould Damage
Before implementing a maintenance programme, it is important to understand the factors that shorten mould life.
3.1 Excessive Pressure
Compression moulds are designed to withstand specified operating loads.
Applying excessive pressure can damage mould surfaces, distort components, overload clamping systems, and accelerate wear.
It may also increase flash formation if the mould is worn, incorrectly aligned, or unable to maintain the required closure.
Prevention:
- Follow the mould and machine manufacturer’s operating limits.
- Use the correct charge quantity.
- Verify press alignment.
- Avoid increasing pressure simply to compensate for poor material flow.
- Investigate repeated flash or incomplete filling before changing pressure settings.
3.2 Excessive Temperature
High temperatures can accelerate oxidation, thermal fatigue, and material degradation, depending on the mould steel and operating environment.
Excessive heat may also affect coatings, seals, heating components, and dimensional stability.
Prevention:
- Use the temperature recommended for the moulding material.
- Monitor temperature at appropriate locations.
- Avoid unnecessary temperature fluctuations.
- Inspect heaters, thermocouples, and temperature controllers.
- Follow the specified heating and cooling procedures.
3.3 Poor Cleaning Practices
Material residue, cured compounds, carbonised deposits, and release-agent buildup can accumulate on mould surfaces.
If deposits are removed using aggressive tools or unsuitable chemicals, the mould surface may become scratched, pitted, or corroded.
Prevention:
- Clean the mould at suitable intervals.
- Use cleaning agents approved for the mould material and coating.
- Avoid uncontrolled scraping or abrasive polishing.
- Remove deposits before they become difficult to clean.
- Inspect the cavity after cleaning.
3.4 Improper Demoulding
Removing a product before it is sufficiently cured or stable can increase the force required for demoulding.
Using metal tools to pry out a stuck product can scratch the cavity, damage edges, or bend small features.
Prevention:
- Follow the recommended curing cycle.
- Use suitable ejectors or approved demoulding tools.
- Avoid striking the mould with hammers.
- Investigate repeated sticking rather than increasing removal force.
- Check whether the mould surface, draft angle, or release system requires attention.
3.5 Corrosion
Moisture, aggressive cleaning chemicals, and unsuitable storage conditions can cause corrosion on mould surfaces.
Corrosion can damage polished cavities, create surface defects, and interfere with product release.
Prevention:
- Dry the mould thoroughly after wet cleaning.
- Apply a compatible corrosion inhibitor when appropriate.
- Store the mould in a clean, dry environment.
- Protect exposed steel surfaces during long periods of inactivity.
- Inspect the mould before putting it back into production.
3.6 Poor Material Selection
Some moulding compounds contain abrasive fillers, fibres, or other ingredients that increase wear.
Materials with unsuitable processing characteristics may also create excessive deposits or require operating conditions that are inappropriate for the mould.
Prevention:
- Select mould materials suitable for the application.
- Confirm compatibility between the mould, compound, and cleaning agents.
- Review material specifications.
- Consider wear-resistant treatments or coatings where justified.
- Avoid unapproved material substitutions.
3.7 Improper Storage
A mould that is stored while damp, contaminated, or exposed to damaging conditions may deteriorate even when it is not being used.
Prevention:
- Clean and dry the mould before storage.
- Protect cavity surfaces from dust and moisture.
- Apply suitable corrosion protection.
- Store the mould securely to prevent impact damage.
- Maintain a storage and inspection record.
4. Establish a Regular Mould Cleaning Schedule
Cleaning is one of the simplest and most effective ways to extend compression mould life.
The required frequency depends on the material, production volume, release agent, operating temperature, and tendency for deposits to accumulate.
Step 1: Allow the Mould to Reach a Safe Condition
Before cleaning, follow the approved shutdown procedure.
Isolate the equipment where required and allow the mould to cool sufficiently for the intended cleaning method. Use appropriate protective equipment.
Some cleaning procedures are designed for warm moulds, but they should only be performed when the mould manufacturer and cleaning-product instructions permit them.
Step 2: Remove Loose Residues
Use a soft brush, lint-free cloth, or another approved tool to remove loose material.
Avoid sharp metal tools that can scratch the cavity or damage edges.
Step 3: Apply a Suitable Cleaning Agent
Choose a cleaning product compatible with the mould steel, coating, seals, and any other exposed components.
Follow the supplier’s instructions for concentration, application time, ventilation, and handling.
Step 4: Remove Deposits Carefully
Use an approved non-abrasive method to remove remaining material.
For stubborn deposits, use a cleaning method specifically recommended for the mould and residue type.
Avoid aggressive grinding or polishing unless carried out as an authorised repair.
Step 5: Dry the Mould
Remove moisture from the cavity, vents, joints, and other areas where water may remain.
Thorough drying is especially important for moulds made from corrosion-prone steels.
Step 6: Inspect the Surface
Check for:
- Scratches.
- Corrosion.
- Cracks.
- Pitting.
- Material buildup.
- Blocked vents.
- Damaged edges.
- Changes in surface finish.
Record any defects that require repair.
Step 7: Apply Protection if Required
If the mould will not be used immediately, apply a compatible corrosion inhibitor to suitable exposed surfaces.
Before production resumes, remove protective products where necessary according to the manufacturer’s instructions.
5. Control Temperature to Reduce Mould Wear
Temperature control is essential because compression moulds experience repeated thermal cycles.
Excessive or uneven heating can contribute to thermal stress, oxidation, distortion, and damage to certain mould materials or surface treatments.
Best Practices for Temperature Control
1. Follow the recommended temperature range
Use the processing temperature specified for the moulding compound and approved mould setup.
2. Allow uniform heating
Where the process requires preheating, allow the mould to reach a sufficiently stable temperature before production begins.
3. Avoid unnecessary temperature fluctuations
Repeated large temperature changes can increase thermal stress.
4. Check heating elements
Inspect heaters, temperature sensors, and electrical connections according to the maintenance schedule.
5. Monitor temperature consistency
Where appropriate, measure temperature at multiple points to identify uneven heating.
6. Maintain accurate control systems
Calibrate temperature sensors and verify controller performance when readings become inconsistent.
7. Use suitable cooling procedures
Avoid uncontrolled cooling or quenching unless the mould and process are specifically designed for it.
Benefits of Proper Temperature Control
- Reduced thermal stress.
- More consistent curing.
- Improved product quality.
- Lower risk of overheating.
- Reduced variation between production cycles.
- Better protection of mould surfaces and components.
Temperature control should be coordinated with pressure and curing time rather than adjusted independently.
6. Maintain Correct Compression Pressure
Compression moulds must operate within their designed pressure limits.
Excessive pressure can damage the mould, while insufficient pressure may result in incomplete filling or poor product formation.
How to Maintain Proper Pressure
- Confirm the required pressure for the material and product.
- Check the press manufacturer’s operating limits.
- Ensure that the correct quantity of material is loaded.
- Inspect the mould for damage that may affect closure.
- Check alignment between the upper and lower mould halves.
- Verify the condition of the press platens and clamping system.
- Monitor pressure readings for unexpected changes.
- Investigate repeated flash, sticking, or incomplete filling before increasing pressure.
Why Charge Quantity Matters
The amount of material placed in the mould affects how the cavity fills and how the mould closes.
Too much material can increase flash and may place unnecessary loads on the mould and press. Too little material can cause incomplete filling.
The correct charge quantity should be established through the approved process specification.
Important: Do not use higher pressure to compensate for blocked vents, incorrect material preparation, poor temperature control, or an unsuitable mould design.
7. Protect the Mould Surface
The mould cavity is one of the most important parts of the tool because its surface directly influences product appearance and release.
Scratches, pitting, corrosion, and deposits can transfer defects to the finished product.
Recommended Surface Protection Practices
- Use approved cleaning tools.
- Avoid metal scraping unless the procedure specifically permits it.
- Prevent mould halves from striking each other during handling.
- Protect polished surfaces from hard objects.
- Use compatible release agents when required.
- Avoid excessive release-agent application.
- Clean the cavity before deposits become difficult to remove.
- Repair surface damage using an appropriate qualified process.
Should Every Compression Mould Be Polished?
No. Polishing should be based on the required surface finish and mould design.
Unnecessary polishing may alter dimensions, round sharp edges, or damage textured surfaces.
If a mould requires polishing, it should be carried out by a skilled technician using the correct methods and surface-finish specifications.
8. Maintain Vents and Flash Grooves
Vents allow trapped air and gases to escape from the mould cavity during compression moulding.
If vents become blocked by cured material or deposits, trapped gases may contribute to burn marks, incomplete filling, or other defects.
Flash grooves and parting-line features must also remain in good condition.
Maintenance Procedure
- Inspect vents regularly.
- Remove deposits using an approved cleaning method.
- Avoid enlarging or deepening vent channels unintentionally.
- Check the parting line for damage.
- Inspect flash grooves for material buildup.
- Confirm that the mould closes correctly.
- Record recurring vent blockage or gas-related defects.
Why Vent Dimensions Matter
Vents are designed to allow gases to escape while limiting material leakage.
If a vent is enlarged during cleaning or repair, excessive flash may occur. If it becomes too restricted, trapped gases may remain inside the cavity.
Vent dimensions should therefore be maintained according to the mould design.
9. Inspect Guide Pins, Guide Bushes, and Alignment Components
Guide pins and guide bushes help the mould halves align correctly during closure.
Worn or damaged alignment components may allow movement between the mould halves, leading to uneven loading, flash, dimensional variation, and accelerated wear.
Inspection Points
Check for:
- Excessive clearance.
- Scratches or scoring.
- Uneven wear.
- Corrosion.
- Loose components.
- Damaged mounting areas.
- Poor alignment during closure.
Maintenance Practices
- Clean guide components regularly.
- Use the specified lubricant where lubrication is required.
- Avoid excessive lubricant that may contaminate the cavity or product.
- Replace worn components according to the maintenance specification.
- Investigate unusual resistance or noise during mould closing.
Do not continue production if serious alignment problems could damage the mould or create unsafe operating conditions.
10. Use Suitable Lubrication
Lubrication reduces friction between moving components where lubrication is required.
It can help protect guide pins, guide bushes, sliding components, and other designated mechanical parts.
However, not every mould surface should be lubricated.
Lubrication Best Practices
- Identify the components that require lubrication.
- Use the lubricant specified by the mould or equipment manufacturer.
- Apply the recommended quantity.
- Keep lubricants away from product-contact surfaces unless specifically approved.
- Remove excess lubricant where necessary.
- Follow the recommended lubrication schedule.
- Inspect components for wear even when lubrication is maintained.
Using the wrong lubricant can cause contamination, chemical incompatibility, or damage to certain seals and coatings.
11. Select the Right Mould Material
Mould material has a major influence on service life.
The best choice depends on operating temperature, applied pressure, material abrasiveness, corrosion exposure, required surface finish, and production volume.
Common Mould Materials
| Mould Material | Advantages | Important Considerations |
|---|---|---|
| Tool steel | High strength and good wear resistance in suitable grades | May require corrosion protection depending on grade and environment |
| Hardened steel | Suitable for demanding applications requiring surface durability | Requires appropriate machining, heat treatment, and maintenance |
| Stainless steel | Improved corrosion resistance in suitable grades | Wear resistance and hardness depend on the specific grade |
| Aluminium alloys | Good thermal conductivity and relatively low weight | Generally less wear-resistant than suitable hardened tool steels |
| Specialised coated steel | Surface treatment may improve wear or release characteristics | Coating compatibility and maintenance requirements must be considered |
There is no universally best mould material.
For high-volume production, a wear-resistant tool steel may be appropriate. For applications where corrosion resistance is particularly important, a suitable stainless steel may be preferred.
The choice should be based on the actual operating conditions and expected service life.
12. Consider Surface Treatments and Protective Coatings
Surface treatments and coatings can improve mould performance when selected for the application.
Depending on the material and process, options may include nitriding, hard coatings, or other surface-engineering treatments.
Potential Benefits
- Improved wear resistance.
- Reduced surface damage.
- Better resistance to certain forms of corrosion.
- Improved release characteristics in suitable applications.
- Longer service life under appropriate conditions.
Important Considerations
Not every treatment is suitable for every mould.
A coating may change surface dimensions, affect friction, or be damaged by unsuitable cleaning methods.
Before applying a treatment, consider:
- Mould base material.
- Operating temperature.
- Contact pressure.
- Material chemistry.
- Required surface finish.
- Dimensional tolerances.
- Repair and recoating requirements.
Surface treatments should be selected by qualified specialists and verified against the mould’s operating requirements.
13. Prevent Corrosion During Storage
Corrosion can damage mould cavities and reduce the quality of products manufactured later.
It is particularly important to protect moulds that remain unused for long periods.
Recommended Storage Procedure
Step 1: Clean the mould
Remove all residual moulding compound, release agent, and contamination.
Step 2: Dry thoroughly
Ensure that moisture is removed from cavities, vents, joints, and other exposed areas.
Step 3: Inspect the mould
Look for corrosion, wear, scratches, and other damage that may require attention before storage.
Step 4: Apply corrosion protection
Use a suitable protective product compatible with the mould material and future processing requirements.
Step 5: Protect the cavity
Cover the mould or place it in suitable protective packaging to prevent dust, moisture, and accidental damage.
Step 6: Store in a controlled environment
Choose a clean, dry storage location with suitable temperature and humidity conditions.
Step 7: Record storage details
Document the storage date, mould identification number, condition, and any protection applied.
Before Reusing a Stored Mould
- Remove protective products where necessary.
- Inspect the cavity and parting line.
- Check vents and alignment components.
- Verify that the mould is clean.
- Confirm that heating and temperature-control systems work correctly.
- Conduct an appropriate trial before full production resumes.
14. Preventive Maintenance Schedule for Compression Moulds
A preventive maintenance schedule helps detect wear before it causes significant production problems.
The exact frequency should depend on production volume, moulding material, operating conditions, and the manufacturer’s recommendations.
| Maintenance Frequency | Recommended Activities |
|---|---|
| Before production | Inspect the cavity, parting line, vents, alignment, and heating system |
| During production | Monitor product quality, temperature, pressure, and abnormal operating conditions |
| After each production run | Remove residues, inspect surfaces, and clean as required |
| At scheduled intervals | Check guide components, fasteners, lubrication points, and vent condition |
| Periodically | Verify temperature sensors, pressure controls, and alignment |
| During planned shutdowns | Perform a detailed mould inspection and address wear or corrosion |
| Before long-term storage | Clean, dry, protect, and document the mould condition |
| Before returning to service | Remove protective materials as needed and verify safe operation |
For high-volume production, maintenance may be scheduled by cycle count rather than calendar time.
A cycle-based schedule is useful because two moulds operating for the same number of months may experience very different levels of wear.
15. Common Compression Mould Problems and Their Solutions
| Problem | Possible Cause | Recommended Solution |
|---|---|---|
| Excessive flash | Overcharging, mould wear, alignment problems, or unsuitable pressure | Check charge quantity, parting line, alignment, and process settings |
| Product sticking | Inadequate curing, surface damage, or unsuitable release conditions | Review curing time, cavity condition, and approved release procedures |
| Burn marks | Trapped gases, blocked vents, or unsuitable processing conditions | Clean vents and review the moulding cycle |
| Uneven product dimensions | Mould wear, uneven temperature, or inconsistent pressure | Inspect the mould and verify temperature and pressure controls |
| Scratches on products | Damaged cavity surfaces or aggressive cleaning | Inspect and repair the surface using an approved method |
| Corrosion on mould surfaces | Moisture, unsuitable chemicals, or poor storage | Clean, dry, protect, and store the mould appropriately |
| Incomplete filling | Insufficient material, poor flow, low temperature, or blocked vents | Check charge quantity, material conditions, and venting |
| Difficult mould closure | Contamination, alignment problems, or damaged components | Stop safely and inspect the mould and press |
| Premature wear | Abrasive material, excessive loading, or inadequate maintenance | Review mould material, operating conditions, and maintenance procedures |
| Uneven curing | Temperature variation, inconsistent charge placement, or incorrect cycle time | Check heating uniformity, material preparation, and curing conditions |
These problems may have several causes. A defect should be investigated systematically rather than corrected by increasing pressure or temperature without evidence.
16. Keep Accurate Mould Maintenance Records
Maintenance records help manufacturers understand how a mould performs over time.
They also support production planning, troubleshooting, and decisions about repair or replacement.
Information to Record
- Mould identification number.
- Product name and moulding material.
- Total production cycles.
- Operating temperature and pressure.
- Cleaning dates.
- Lubrication activities.
- Inspection findings.
- Surface repairs and polishing.
- Replacement of guide components.
- Heating-system repairs.
- Corrosion or wear observations.
- Product defect trends.
- Storage and return-to-service dates.
Why Records Are Important
Suppose a mould begins producing excessive flash after a certain number of cycles. Maintenance records may reveal that the problem is associated with increasing parting-line wear.
Similarly, repeated surface defects may indicate that cleaning methods are damaging the cavity.
Accurate records help identify these patterns before the mould becomes unsuitable for production.
17. How to Determine When a Compression Mould Needs Repair
A mould should not be kept in production simply because it can still close and operate.
Repair may be necessary when wear begins to affect product quality, process stability, or safe operation.
Signs That Repair May Be Required
- Repeated dimensional variation.
- Increasing flash.
- Persistent product sticking.
- Scratched or pitted cavity surfaces.
- Damaged parting lines.
- Cracked mould components.
- Excessive clearance in guide components.
- Uneven heating.
- Blocked or damaged vents.
- Repeated defects despite correct processing conditions.
Recommended Repair Procedure
- Stop production when a defect presents a significant quality or safety risk.
- Identify the affected mould component.
- Inspect and measure the damaged area.
- Compare measurements with the original design specifications.
- Determine whether cleaning, polishing, component replacement, or specialist repair is appropriate.
- Perform repairs using qualified personnel.
- Inspect the mould after repair.
- Conduct a trial run and verify product quality before returning to full production.
Welding, grinding, re-machining, and other major repairs can affect mould dimensions and material properties. They should be performed only with an appropriate repair plan.
18. Best Practices for Extending Compression Mould Life
The following practices provide a practical foundation for long-term mould maintenance.
1. Follow the Approved Operating Parameters
Use the specified temperature, pressure, curing time, and charge quantity.
Avoid operating outside the mould’s design limits.
2. Clean the Mould Regularly
Remove residues before they accumulate and become difficult to remove.
3. Use Appropriate Cleaning Tools
Protect cavity surfaces from scratches, abrasion, and accidental impact.
4. Maintain Uniform Temperature
Check heating performance and avoid unnecessary thermal fluctuations.
5. Monitor Pressure and Alignment
Confirm that the press and mould operate within their specified limits.
6. Protect Vents and Parting Lines
Keep gas-release passages clean and maintain the surfaces that allow the mould to close correctly.
7. Maintain Moving Components
Inspect guide pins, bushes, and other designated moving parts for wear and proper lubrication.
8. Use Suitable Materials and Release Agents
Confirm compatibility with the mould material, product requirements, and processing temperature.
9. Store Moulds Correctly
Clean, dry, protect, and securely store moulds that are not in use.
10. Train Operators
Ensure that operators understand correct mould handling, cleaning, startup, shutdown, and defect reporting procedures.
11. Inspect Products Consistently
Changes in product quality can provide early warning of mould wear.
12. Plan Maintenance Before Failure
Scheduled inspection and preventive repair are generally preferable to waiting until a mould causes production stoppages.
Conclusion
Extending compression mould life requires a combination of proper operating conditions, regular cleaning, preventive maintenance, temperature control, pressure management, and careful handling.
The most common causes of premature mould damage include excessive pressure, unsuitable temperature conditions, poor cleaning practices, corrosion, improper demoulding, and inadequate maintenance.
By following a structured maintenance programme, manufacturers can reduce mould wear, improve product quality, minimise downtime, and lower long-term production costs.
The key to extending compression mould life is to prevent damage before it occurs rather than waiting for defects to appear. Regular inspection, accurate maintenance records, correct processing parameters, and timely repairs help ensure that compression moulds remain reliable throughout their intended service life.