1. Introduction
Material sticking in moulds is a common problem in manufacturing processes such as injection moulding, compression moulding, thermoforming, and candle moulding. It occurs when the moulded material adheres to the mould surface and cannot be removed easily after the forming process.
Material sticking can damage the finished product, reduce production efficiency, increase labour costs, and shorten mould service life. In severe cases, the product may tear, deform, crack, or remain trapped inside the mould.
Preventing material sticking requires proper mould design, suitable material selection, correct processing conditions, effective surface finishing, and appropriate use of mould-release agents.
The most effective solution depends on the type of material being moulded, the mould surface, the operating temperature, and the manufacturing process.
2. Causes of Material Sticking in Moulds
Understanding the causes of sticking is the first step towards preventing it.
2.1. High Adhesion Between Material and Mould
Some materials naturally adhere to particular mould surfaces. Adhesion may result from chemical interactions, surface energy, or physical contact between the material and the mould.
For example, certain plastics may adhere strongly to metal surfaces, while molten wax can cling to mould surfaces if the moulding and cooling conditions are unsuitable.
Prevention:
- Select a suitable mould material.
- Use an appropriate surface finish.
- Apply a compatible mould-release agent when necessary.
- Maintain the mould surface in good condition.
2.2. Incorrect Mould Temperature
Mould temperature significantly affects material flow, solidification, shrinkage, and release.
If the mould is too hot, the material may remain soft or tacky during removal. If the mould is too cold, some materials may cool unevenly or develop internal stresses that complicate demoulding.
Prevention:
- Maintain the recommended mould temperature.
- Use suitable heating or cooling systems.
- Monitor temperature during production.
- Allow adequate cooling or curing time.
The ideal temperature depends on the material and process; there is no single temperature that prevents sticking in every application.
2.3. Insufficient Cooling or Curing Time
Removing a moulded product before it has developed sufficient strength can cause deformation, stretching, or sticking.
For example, plastic components may be too soft to withstand ejection forces, while incompletely cured thermosetting materials may adhere to the mould.
Prevention:
- Establish an appropriate cooling or curing cycle.
- Verify that the material has sufficient strength before removal.
- Ensure cooling is reasonably uniform throughout the mould.
- Avoid shortening the cycle without confirming that demoulding remains reliable.
2.4. Poor Mould Surface Finish
Rough surfaces, scratches, pits, and machining marks can increase mechanical interlocking between the moulded material and the mould.
These irregularities can make it more difficult to remove the product, particularly when the material shrinks tightly around the mould surface.
Prevention:
- Polish mould surfaces where appropriate.
- Remove burrs and sharp edges.
- Repair scratches and damaged cavity surfaces.
- Use a surface texture suited to the material and product design.
A mirror finish is not always necessary. Certain textures can improve release, while other textures may increase mechanical locking.
2.5. Incorrect Mould Design
Poor mould design can prevent the product from separating cleanly from the mould.
Common design problems include insufficient draft angles, deep undercuts, narrow cavities, unsuitable parting lines, and poorly positioned ejector systems.
Prevention:
- Provide adequate draft angles.
- Minimise unnecessary undercuts.
- Design effective ejection mechanisms.
- Avoid sharp internal corners where possible.
- Consider material shrinkage during mould design.
Draft requirements depend on the material, depth of the cavity, surface texture, and geometry of the product.
2.6. Excessive Material Shrinkage
Some materials shrink during cooling or curing. Depending on the geometry, this shrinkage may cause the product to grip tightly around a core or become difficult to release from the cavity.
Prevention:
- Account for shrinkage during mould design.
- Optimise cooling conditions.
- Use appropriate core and cavity geometry.
- Ensure that ejection forces are distributed properly.
Shrinkage does not always increase sticking. In some mould designs, shrinkage helps the product separate from the cavity but causes it to grip the core. The direction and effect depend on the geometry.
2.7. Incorrect Material Formulation
The composition of the moulding material can influence its adhesion, flow behaviour, shrinkage, and release characteristics.
For example, unsuitable additives, excessive tackiness, contamination, or incorrect material proportions may cause sticking.
Prevention:
- Use materials that meet the required specifications.
- Follow the supplier’s formulation and processing instructions.
- Prevent contamination.
- Verify the correct proportions of components in reactive materials.
- Avoid unapproved additives that may interfere with mould release.
3. Methods of Preventing Material Sticking in Moulds
Several techniques can be used individually or in combination.
3.1. Applying Mould-Release Agents
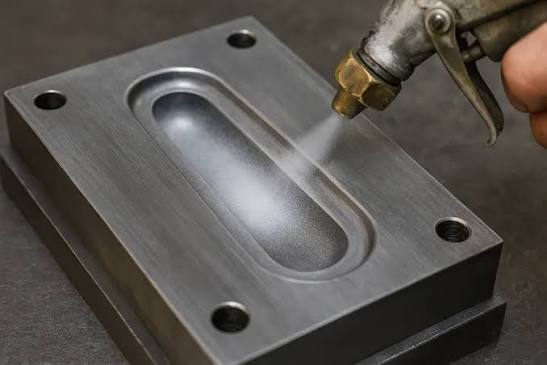
Mould-release agents are substances applied to a mould surface to reduce adhesion between the mould and the moulded product.
They create a separating layer that helps the product release more easily.
Types of Mould-Release Agents
A. Silicone-based release agents
These are used in certain moulding applications to provide a low-adhesion surface.
Advantages:
- Effective release in suitable applications.
- Convenient application in many formulations.
- Useful for selected rubber, plastic, and other moulding processes.
Limitations:
- May contaminate surfaces that must later be painted, bonded, printed, or coated.
- Compatibility with the moulding material must be checked.
B. Wax-based release agents
Wax-based products are used in some composite, thermosetting, and other moulding applications.
Advantages:
- Can provide effective release when correctly applied.
- Suitable for selected mould materials and manufacturing processes.
- May be useful when a durable release film is required.
Limitations:
- Excessive application may cause surface defects.
- Wax deposits can accumulate.
- Not every wax-based product is suitable for every moulding process.
C. Water-based release agents
These formulations use water as a carrier for release-promoting ingredients.
Advantages:
- Can reduce the use of volatile organic solvents.
- May provide convenient application and cleaning.
- Available for a range of industrial applications.
Limitations:
- May require drying before moulding.
- Performance depends on formulation and process conditions.
D. Semi-permanent release agents
Semi-permanent release agents form a surface layer intended to provide multiple releases before reapplication is necessary.
Advantages:
- Can reduce frequent application.
- May improve process consistency.
- Can reduce transfer of release material to finished products.
Limitations:
- Require appropriate surface preparation.
- Performance depends on curing, compatibility, and maintenance.
Correct Application Procedure
- Clean the mould surface thoroughly.
- Remove wax residues, oil, dust, and other contaminants.
- Dry the mould if required by the product instructions.
- Apply a thin, uniform layer of the recommended release agent.
- Allow the product to dry or cure as directed.
- Conduct a trial to verify release performance.
- Reapply according to the manufacturer’s instructions.
Important: More release agent is not necessarily better. Excessive application can cause surface blemishes, poor adhesion during secondary finishing, and contamination of the moulded product.
3.2. Improving Mould Surface Finish
Surface finishing helps reduce unwanted adhesion and mechanical locking.
Common methods include:
- Mechanical polishing.
- Manual polishing.
- Fine abrasive finishing.
- Grinding.
- Lapping.
- Suitable surface coatings.
- Controlled surface texturing.
Benefits of Proper Surface Finishing
- Easier product removal.
- Reduced surface damage.
- Improved appearance of moulded components.
- Reduced accumulation of residues in suitable applications.
- Easier cleaning and maintenance.
The appropriate finish depends on the product. A highly polished surface may be necessary for transparent plastic parts, whereas some textured surfaces may provide better release for specific applications.
3.3. Providing Adequate Draft Angles
A draft angle is a slight taper incorporated into the sides of a moulded component to help it separate from the mould.
Without sufficient draft, the product may rub against the mould walls or become mechanically locked.
Benefits of Draft Angles
- Reduce friction during ejection.
- Reduce the risk of scratching.
- Minimise deformation during removal.
- Reduce ejection force.
- Improve moulding consistency.
The required draft depends on the material, component depth, surface texture, and moulding conditions. Textured surfaces generally require more draft than smooth surfaces.
3.4. Optimising Mould Temperature
Temperature control is essential for reliable demoulding.
If the temperature is unsuitable, the material may remain too soft, develop excessive adhesion, or cool unevenly.
Recommended Practices
- Follow the material supplier’s processing-temperature recommendations.
- Monitor mould temperature during production.
- Maintain consistent heating and cooling.
- Inspect cooling channels for blockages or deposits.
- Avoid sudden temperature changes that could damage the product or mould.
- Validate the temperature using actual demoulding and product-quality results.
In injection moulding, temperature affects melt flow, solidification, shrinkage, and residual stress. In compression moulding, it also affects curing. In wax moulding, it influences solidification and shrinkage.
3.5. Optimising Cooling and Curing Time
Adequate cooling or curing allows the moulded material to develop sufficient strength for removal.
Methods
- Determine the appropriate cycle time for the material.
- Ensure that the product cools or cures sufficiently.
- Check whether the mould has hot spots.
- Use suitable cooling-channel placement and coolant flow.
- Verify that the part can withstand ejection forces.
- Reduce cycle time only after confirming acceptable release and product quality.
Overcooling can also be undesirable in some processes because it may increase cycle time or affect shrinkage and ejection behaviour. The goal is an appropriate, repeatable process rather than the longest possible cooling period.
3.6. Using Suitable Mould Materials
Mould material influences surface quality, heat transfer, corrosion resistance, and wear resistance.
Common materials include:
- P20 mould steel.
- H13 tool steel.
- Stainless mould steel.
- Aluminium alloys.
- Copper-alloy inserts.
For example, stainless mould steel may be useful where corrosion is a concern, while aluminium may offer advantages in heat transfer and machining for suitable applications.
The mould material should be selected according to the moulding material, production volume, temperature, required surface finish, and expected service life.
3.7. Designing an Effective Ejection System
An ejection system removes the moulded component after the mould opens.
An unsuitable ejection system may cause the part to stick, deform, crack, or develop visible marks.
Common ejection systems include:
- Ejector pins.
- Ejector sleeves.
- Stripper plates.
- Stripper rings.
- Air-assisted ejection.
- Specialised mechanical release systems.
Best Practices
- Distribute ejection forces appropriately.
- Place ejectors where the part can withstand the load.
- Keep ejector pins clean and correctly aligned.
- Avoid excessive ejection speed.
- Ensure sufficient draft.
- Use a stripper system for suitable thin-walled or delicate parts.
Air-assisted ejection can help in selected applications, but it must be designed for the material and mould geometry.
3.8. Maintaining Proper Venting
Venting allows trapped air and certain gases to escape from the mould cavity.
Poor venting can cause trapped gas, incomplete filling, burn marks, and localised defects. These problems can sometimes make the moulded component more difficult to remove.
Prevention Methods
- Provide vents at suitable locations.
- Keep vents clean.
- Inspect for plastic residue or blockages.
- Use vent dimensions appropriate to the material.
- Maintain vent surfaces during mould servicing.
Vents must be designed carefully because excessively deep or poorly positioned vents can allow material to escape and create flash.
3.9. Controlling Injection or Forming Pressure
Excessive or unsuitable processing pressure can contribute to flash, high cavity loading, and difficult ejection under some conditions.
In injection moulding, excessive packing pressure may increase the force needed to remove certain parts. In compression moulding, inappropriate pressure can affect flash formation and material distribution.
Prevention:
- Follow recommended processing parameters.
- Optimise injection, holding, and packing pressures.
- Avoid excessive overpacking.
- Check mould alignment and clamping conditions.
- Confirm that the part fills correctly without unnecessary pressure.
Pressure should not simply be reduced to solve sticking. Insufficient pressure can cause short shots, poor surface replication, or other defects. The objective is to establish a balanced process window.
3.10. Cleaning the Mould Regularly
Material residues, degraded polymer, wax deposits, and contamination can accumulate on mould surfaces.
These deposits may alter surface texture, obstruct vents, and increase sticking.
Cleaning Procedure
- Stop production and follow the equipment isolation procedure.
- Allow the mould to reach a safe condition for cleaning.
- Remove loose residues using suitable tools.
- Apply a cleaning product compatible with the mould material.
- Avoid scratching polished surfaces.
- Clean vents, ejectors, and other areas where residue accumulates.
- Dry and protect the mould where required.
- Inspect the mould before restarting production.
Avoid aggressive scraping or unapproved chemicals that could damage the cavity or protective coatings.
4. Preventing Sticking in Different Moulding Processes
The best prevention strategy varies by manufacturing process.
4.1. Injection Moulding
Injection moulding involves injecting molten plastic into a closed mould under pressure.
Common causes of sticking:
- Insufficient draft.
- Incorrect mould temperature.
- Excessive packing pressure.
- Poor ejection design.
- Rough or damaged cavity surfaces.
- Material shrinkage around the core.
- Degraded polymer deposits.
- Inadequate venting.
Prevention methods:
- Optimise draft angles.
- Adjust mould temperature and cooling time.
- Optimise injection and holding pressure.
- Use a suitable ejection system.
- Maintain the cavity surface.
- Clean vents and ejector components.
- Use compatible release agents only when necessary and approved for the process.
In many injection moulding applications, correct mould design and process optimisation are preferable to relying on release agents.
4.2. Compression Moulding
Compression moulding uses heat and pressure to shape material inside a mould.
It is commonly used for thermosetting plastics, rubber, and selected composite materials.
Common causes of sticking:
- Inadequate or excessive curing.
- Incorrect mould temperature.
- Unsuitable release agent.
- Material residue.
- Damaged mould surfaces.
- Incorrect material charge.
Prevention methods:
- Control mould temperature and curing time.
- Select a release agent compatible with the material.
- Apply the correct material charge.
- Clean the mould after suitable production intervals.
- Maintain smooth, undamaged mould surfaces.
- Use suitable ejectors or mechanical release features.
For thermosetting materials, the cure cycle must be optimised. Removing the part too early can cause deformation, while an unsuitable temperature or excessive residence time can create other release problems.
4.3. Thermoforming
Thermoforming involves heating a thermoplastic sheet until it becomes formable and then shaping it over or into a mould.
Common causes of sticking:
- Insufficient draft.
- Excessive forming temperature.
- Deep or complex cavities.
- Poor mould surface finish.
- Inadequate cooling.
- Vacuum or pressure conditions that make separation difficult.
Prevention methods:
- Provide suitable draft angles.
- Optimise sheet-heating temperature.
- Control mould temperature.
- Use appropriate vacuum and pressure settings.
- Design suitable air-assist or release features.
- Maintain the mould surface.
- Ensure the part has cooled sufficiently before removal.
4.4. Candle Moulding
Candle moulding involves pouring or injecting molten wax into a mould and allowing it to solidify.
Common causes of sticking:
- Incorrect wax or mould temperature.
- Insufficient solidification.
- Mould damage or contamination.
- Complex shapes with undercuts.
- Excessive adhesion to the mould surface.
- Incorrect wax formulation.
Prevention methods:
- Select wax suitable for the intended mould.
- Follow recommended wax heating and pouring temperatures.
- Allow sufficient cooling and shrinkage.
- Use moulds designed for easy release.
- Clean and dry the mould between uses.
- Use a compatible release agent only when necessary.
Many candle waxes shrink as they cool, which can help release the finished candle. However, the degree of shrinkage varies with wax composition, mould geometry, and cooling conditions.
4.5. Rubber Moulding
Rubber moulding may involve natural rubber, synthetic rubber, silicone, or other elastomeric materials.
Common causes of sticking:
- Incorrect curing conditions.
- Poor mould surface condition.
- Incompatible release agents.
- Material deposits.
- Insufficient draft in rigid mould sections.
Prevention methods:
- Follow the specified curing cycle.
- Use a suitable mould-release product.
- Maintain clean mould surfaces.
- Optimise the mould design.
- Check compatibility between the rubber formulation and release agent.
Some silicone rubber systems require specific release practices, and release agents can interfere with subsequent bonding or coating operations. Compatibility should always be verified.
5. Comparison of Sticking Prevention Methods
| Prevention method | Main purpose | Suitable applications | Important consideration |
|---|---|---|---|
| Mould-release agent | Reduces adhesion | Various moulding processes | Must be compatible with the material and finishing requirements |
| Surface polishing | Reduces unwanted surface irregularities | Precision moulds and suitable smooth cavities | Excessive polishing may not be beneficial for every design |
| Draft angles | Reduces friction and mechanical locking | Injection moulding, thermoforming, compression moulding | Draft depends on depth, material, and texture |
| Temperature control | Improves material flow and solidification | Most thermal moulding processes | Must be adapted to the specific material |
| Cooling or curing optimisation | Ensures sufficient strength for removal | Plastics, rubber, composites, and wax | Excessive cycle time may reduce productivity |
| Suitable mould material | Improves durability and surface performance | All moulding processes | Selection depends on wear, corrosion, heat, and cost |
| Ejection-system improvement | Removes the product reliably | Mainly injection and other mechanically ejected moulds | Ejection forces must be distributed properly |
| Venting | Allows trapped air and gases to escape | Injection and compression moulding | Vents must be correctly sized and positioned |
| Pressure optimisation | Prevents overpacking and related defects | Injection and compression moulding | Excessively low pressure can cause incomplete forming |
| Regular cleaning | Removes residues and contamination | All moulding processes | Cleaning tools and chemicals must not damage the mould |
6. Common Problems and Their Solutions
| Problem | Possible cause | Recommended solution |
|---|---|---|
| Product remains inside the cavity | Poor draft or insufficient ejection | Review mould design and ejection system |
| Product sticks to the core | Shrinkage around the core | Improve draft, core finish, and ejection |
| Product surface is scratched during removal | Rough mould surface or excessive ejection force | Improve surface finish and adjust ejection |
| Wax candle breaks during demoulding | Insufficient solidification or fragile geometry | Adjust cooling and revise mould design |
| Plastic part deforms during ejection | Insufficient cooling or weak part geometry | Optimise cooling and ejection timing |
| Material accumulates on the mould | Degradation, contamination, or unsuitable release conditions | Clean the mould and review processing parameters |
| Part has burn marks | Poor venting or trapped gases | Inspect and maintain vents; review process conditions |
| Release agent causes surface defects | Excessive application or incompatibility | Use a compatible product and apply it as directed |
| Moulded part develops flash | Excessive pressure, poor clamping, or mould damage | Check pressure, alignment, clamping, and parting surfaces |
| Sticking develops gradually | Surface wear, deposits, or changing process conditions | Inspect the mould and compare current settings with the validated process |
7. Best Practices for Preventing Material Sticking
The following practices help maintain reliable moulding operations.
7.1. Use the Correct Material
Choose a moulding material that is compatible with the mould and the intended process.
7.2. Follow Recommended Processing Parameters
Maintain suitable temperatures, pressures, cooling times, and curing conditions.
7.3. Design for Easy Release
Incorporate suitable draft angles, parting lines, ejector locations, and other release features.
7.4. Maintain the Mould Surface
Inspect cavities for scratches, deposits, corrosion, and other defects.
7.5. Apply Release Agents Correctly
Use only compatible products and follow the manufacturer’s application instructions.
7.6. Avoid Excessive Ejection Force
Excessive force can damage both the moulded product and the mould. Correct the underlying release problem instead of simply increasing ejection force.
7.7. Monitor Production Consistency
Record important process settings and monitor changes in release performance. A gradual increase in sticking may indicate a developing maintenance or process problem.
7.8. Train Operators
Operators should know how to recognise sticking, use approved cleaning methods, apply release agents safely, and report recurring defects.
8. Safety Precautions
Preventing material sticking should not compromise workplace safety.
- Follow the machine manufacturer’s operating and maintenance procedures.
- Isolate equipment before cleaning or servicing moulds.
- Use appropriate protective equipment when handling hot moulds, molten material, or cleaning chemicals.
- Ensure adequate ventilation when using products that release vapours.
- Follow the safety data sheet for each release agent and cleaning product.
- Never use an unapproved chemical simply because it appears to improve release.
- Avoid touching hot mould surfaces without suitable protection.
- Do not bypass machine guards or interlocks to remove stuck products.
- Use approved removal tools and procedures.
If a component becomes trapped in an injection moulding machine, follow the established shutdown and isolation procedure rather than attempting to remove it while the machine is operating.
Conclusion
Preventing material sticking in moulds is essential for improving product quality, reducing manufacturing downtime, and extending mould service life. Sticking may result from adhesion, incorrect temperature, inadequate cooling or curing, poor surface finish, insufficient draft, material shrinkage, or an unsuitable ejection system.
The most effective approach is to identify the underlying cause and apply the appropriate corrective measure. Proper mould design, accurate temperature control, suitable surface finishing, adequate cooling or curing, effective ejection, and regular maintenance are the foundations of reliable demoulding.
Mould-release agents can provide additional assistance when necessary, but they should not replace good mould design and process control. By combining these methods, manufacturers can achieve smoother product removal, more consistent quality, and more efficient production.